How To Hide Your Computer From Windows Network Neighborhood

0 comments

If you share Windows folders, you probably noticed that when you browse Network Neighborhood ("My Network" in XP or "Network" in Vista), Windows broadcast your PC name to anyone browsing on the same subnet.

While this is no big deal, you may want to hide you Computer from being discovered, but still be able to connect to your shared folders.
To hide your computer from being browsed in Network Neighborhood, open a command prompt by clicking on  Start \ Run… and typing the following:
net config server /HIDDEN:YES
If the command was executed successfully, you should see "The command completed successfully." or you can verify with the following command :
net config server
and check that the  "Server hidden" status is Yes:
Server Name                           \\WTN1
Server Comment                       
Software version                      Windows 2002
Server is active on                  
    NetbiosSmb (000000000000)
    NetBT_Tcpip_{F08BC22F-B129-43DF-886A-850FA5A9EF7F} (000c29f61483)
Server hidden                         Yes
Maximum Logged On Users               10
Maximum open files per session        16384
Idle session time (min)               15
The command completed successfully.

 
Now reboot your Computer and when Windows has restarted, you will no longer be able to see it when browsing the network. When you want to connect to a shared folder, you can map the drive using the following syntax from Windows Explorer (Tools \ Map Network Drive…)
\\computername\sharename
So if I wanted to connect to the shared folder called media on my computer named wtn1, I would map it as:
\\wtn1\media
If you want to unhide your Computer, type the following at a command prompt and reboot:
net config server /HIDDEN:NO
Remember, hiding your Computer from the Network is by no means secure or a substitute for security. You should always secure your shares when necessary with proper permissions.

How to Build a game for iOS and Android with Corona

0 comments


So, you decided to make your first game for iOS or Android and you will use Corona? Great choice, let’s see what you need to know to get the things started. We will divide this article in 3 sections; setting up, getting started and final touches.
These steps will be more than enough to figure out the basics of game development on Corona. Don’t forget, some of the most popular games for Smartphones (such as Blast Monkeys and Bubble Ball) were developed using Corona SDK.

Setting up the whole thing

To develop another iTunes hit is not that hard, but first thing you have to do is to download the Corona SDK from the official site. They offer UNLIMITED free trial version where you can play as much as you want until you decide to publish the app. Only at that moment you will need to subscribe. So, sign up for your free membership and start creating eBooks, Games and much more…Corona is one of a kind and you must (at least) try this software.
I was totally clueless about programming and app development but I decided to sign up and give it a try. I will try to go with the eBook and if this goes well- Gaming world here I come!

Getting Started

Corona is great for those physics games where you have to figure out how to jump, push, slice or move in order to reach the goal. You know those 2D popular games; there are thousands of those in the app stores.
First thing you need is a simple text editor such as Notepad; everybody has this, right? Next thing you should do is to write some basic code, so you can see what is going to happen. If you don’t have a clue about it, search a bit on YouTube or download the codes from Corona website, there are tons of these there waiting free of charge.
The Corona application is based on main.lua files, and this is the starting point of the application. Beside this basic file you will see that there are build.settings andconfig.lua parameters.
So, when you write your first code in the Notepad, copy and paste this intobuild.settings file; save it and close. Once you finished this one, go to Notepad again and type another set of codes which will tell the application what to do with the codes that you copied in the build.settings. This set of codes goes to config.lua.
Now there is much more to game building on Corona but this is pretty much the very basic that you need to get started. Now, one article can’t teach you how to make the next big hit for iPhone but we can tell you some basic things that you can use over and over again.
Some basic codes to help you out
For example, if you need to create physics game (these games are so popular) you need just one little line of the code: local physics = require(“physics”); and voila! You have the physics based game.
If you want to make some comment while working on the game you can always insert the comment in the code so you can know what does this code stands for. Just type double dashes and a comment before your code and that’s it. Example — Generate Physics Engine.
If you want to create a text that will be displayed for the player (for example, when he/she is waiting the page to load) write this line of code:

– Create a new text field using native device font

local screenText = display.newText(“…Loading Screen…”, 0, 0, native.systemFont, 16*2);
screenText.xScale = 0.6
screenText.yScale = 0.6;

Instead of a conclusion

If you want to learn more please visit Corona website because this is the best place to learn everything you need about game development using Corona. They even have Corona for dummies kind of books.
Author Bio: The article is written by Jason Phillips. He is a professional writer as well as senior editor at some gaming sites. Click here to know about his sites.

How to Root Nexus 7 On Android 4.1 Jelly Bean, Unlock Bootloader, And Flash ClockworkMod Recovery

1 comments

Amazingly developers have devised a successful way to achieve root to your Nexus 7 when it’s not even released yet. Now you can not only root your Nexus 7 but also can unlock Bootloader and Flash ClockworkMod Recovery.
Here is a step by step guide for How to root Nexus 7 and this process additionally will guide you to how to unlock Bootloader and Flash ClockworkMod Recovery. The whole process is super simple and you just need to follow the guide as it is.
But before we precede any further you must know that this process will void your device warranty and in case any damage occurs, proceed at your own risk.
The whole process is segregated into three parts which include Unlocking of Bootloader, Making ClockworkMod Recovery Permanent and finally gaining root access.

How to Unlock Bootloader

  1. Isntall Android SDk once it is downloaded to your device.
  2. Enter Settings> Developer options to enable USB Debugging.
  3. Connect Nexus 7 to PC using USB cable connection.
  4. Eneter Launch terminal or Command prompt and navigate to fastboot folder where Android SDK is installed and command ‘Fastboot oem unlock’. After flashing is complete enter ‘Fastboot reboot’.
  5. Download the recovery image and place it in fastboot folder and enter the command ‘Fastboot flash recovery CWM-grouper-recovery.img’
  6. Step 6: Reboot  by entering ‘Fastboot reboot’.

How to make ClockworkMod Recovery Permanent

Enter following commands in terminal in the stated sequences
  1. ‘Mount system’
  2. ‘Adb shell’
  3. ‘Cd/system’
  4. ‘Mv recovery-from-boot.p recovery-from-boot.bak’.

How to gain Root Access

  1. Download ‘JB-SuperSU.zip ‘file and place it in your sdcard on your device
  2. Switch off your device to Enter ClockworkMod Recovery (Press Volume up + volume down + power button).
  3. Navigate to choose downloaded JB-superSU.Zip file downloaded and placed on your sdcard.
  4. Reboot your device.
If you have followed all the steps successfully then you are all done by now to select and install your favorite root-only apps.

Ice Cream Sandwich Android 4.0 (ICS) app leaked :Google+ 2.0 and Google Music

0 comments

The Android users must be delighted with the news that the latest version of Android which is Ice Cream Sandwich is now supports Google + as a built in app. The news was came in today after the leaked news for Google music. All the smartphones running on Android 4.0 Ice Cream Sandwich will now having a cool Google + app.
Ice Cream Sandwich Android 4.0 (ICS) app leaked :Google+ 2.0 and Google Music Images has been credited to Androidpolice

No official announcement has been made by any of the search giant players. The news came in by a blog which is totally dedicated to the Google’s operating system and the blog is Android Police. So if you want to know anything and any latest happenings about Android, you must follow the Android Police regularly.
The owner of the blog claimed that the he has that Verizon device which is powered by Android 4.0 Ice Cream Sandwich and the screen shots are also provided by the founder of the blog. The screenshots are pretty much impressive though. Interface and layouts of the app are very much polished and it seems to be smoothly running in the devices with Android 4.0 Ice Cream Sandwich.
This is not the only versions of the Android operating system which supports this app, All the previous version are also compatible with this app. The G+ app runs equally well on smartphone powered by Ginger bread and Tablet PCs powered by Honeycomb versions. The claim made by the blog so far is quite right because if you happen to use the app on any device, this is the coolest Google + app ever.
The blog noted:” As you can see, the update doesn’t bring much in way of function, but it does bring a nice aesthetic update. There is one key thing missing, however: the widget. That’s right — for some reason, the widget is nowhere to be found… but only on phones. This is most likely still a test build, so I would expect the widget to pop back up in the future. It is still available on tablets, and it’s a major upgrade from the current widget.”
Check out your settings before you install it because if you don’t have unknown sources enabled in the settings of your applications, you will not be able to install the app.
The app is now available to download and is easy to install. Have it downloaded and get your hands on it. So if you happen to be a regular user of Google + from your smartphones, this is one is out for you, go grab it, Write us your reviews as well.

Android 4.0 Ice Cream Sandwich Source Code Released

0 comments
Android, one of the most famous operating system on smartphones and tablet computers has recently launched the new flavor of the series which is Android 4.0 Ice Cream Sandwich.
The device which will be for the very first time having the Ice Cream Sandwich is Samsung Nexus smartphone. BY now the Big G has released the open source code of the new flavor of the Android and is available to download now.
The Google promised and finally it has delivered the source code to open source community and what is more interesting is that  the code now available encompasses the complete source code history tree, which includes the never-before-open Android Honeycomb family of releases.
The Ice Cream Sandwich was released to unify the smartphone and tablet platform. Previously GIngerbread was for Smartphones and Honeycomb was dedicated to the tablet computers.
Jean Baptiste, who is software engineer on the Android open source project at Google noted: “This is actually the source code for version 4.0.1 of Android, which is the specific version that will ship on the Galaxy Nexus, the first Android 4.0 device.
In the source tree, you will find a device build target named “full_maguro” that you can use to build a system image for Galaxy Nexus. Build configurations for other devices will come later.”
Jean continued: This release includes the full history of the Android source code tree, which naturally includes all the source code for the Honeycomb releases.
However, since Honeycomb was a little incomplete, we want everyone to focus on Ice Cream Sandwich. So, we haven’t created any tags that correspond to the Honeycomb releases (even though the changes are present in the history.) Google Android 4.0.1, codenamed “Ice Cream Sandwich,” has been released to the open source community.
Well this is a very nice gesture by the company and the Google has been misrepresenting the openness of the ICS.
Do you have any stories related to this news? Feel free to share them with us.

Here’s The Fix if You Cannot Send Out SMS on iPhone 4S, 4 or 3GS

0 comments

It gets really annoying when you can’t send SMS from you phones. As today the most used feature in phones are SMS. Every phone has some sort of fix, if you can’t send out SMS. Like checking you service provider SMS center number. Mostly this is the cause in most of the cases where you can’t send out SMS. Well iPhone users have more difficult time in solving this problem if they don’t know the solution.
Well if you are an iPhone 4S, 4 or 3GS user and can’t send out SMS? tired of doing all available web stuff available like inserting area code, signals are good still facing issue or tried many time to reset you network setting? tried to restore the iPhone old data? setting it up as new iPhone instead of restoring it from a backup? still not got the solution. You will happy to know you got the right place where you will find the obvious solution for this Sms sending issue. Try to follow the instruction given below, at the end of all following stuff you will get your sms back in the idevice
The problem with iPhone lies in the SMS center number. First of all, you need to check your SMS center number to make sure that it’s correct.
You can check by typing the following and press Call:
“*#5005*7672#”
You will then get a message as shown below:
“Setting Interrogation Succeeded
Service Center Address
+8613800100500”
(Note: The SMS center number or Service Center Address above is for China Mobile which is +8613800100500).
Now, if you are sure about your service provider SMS center number and the number is incorrect, you can change it by doing the following:
•    Type the following and after that press the Call button:
**5005*7672*SMSCNUMBER#
(Note: SMSCNUMBER would be your mobile service provider’s Service Center Address. You can Google for it or call your customer support hotline).
For an example, if you’re on Sunrise Switzerland, the message center number is +41765980000, so the command would be:
*5005*7672*+41765980000#
Once you’ve done all the above mentioned, you will see the following message:
“Setting Succeeded
Service Center Address
No Address”
To confirm whether the number is correct or incorrect, type the following again and press Call:
“*#5005*7672#”
That’s it; you have learned to tackle a problem that most of iPhone users will have trouble dealing with. Share with your friends and family and help them out as well.
What’s strange about Apple is that they haven’t incorporated a direct editing feature under Settings. While most of other mobile phones, have such option right in the settings like Nokia, Samsung and LG etc. While looking at Apple past history it’s not too hard to believe that such options isn’t there as they don’t want their users to change much settings in the iPhone.

How to Change Your Computer’s IP Address

0 comments

Sometimes, while browsing your internet you come across something like “Page Not Found” error. You check your internet connection and all the linking cables but all of them seem to be okay. Then you decide to call the Internet Helpline Service that, for sure, takes much time.
Actually, the problem is with your computer’s Internet protocol address a.k.a IP address. IP address is a way to identify users on internet through their computers. When you face “Page Not Found” error, it means that your computer’s IP address might have been banned. In this case, changing your computer’s IP address may solve the problem. This is very easy and simple, and you can do it using Command prompt. Just follow the steps given below.

For Windows XP users:
  1. Got to Start Menu.
  2. Click “Run” on menu.
  3. Type ‘cmd’ in the box (without quote) and press OK.
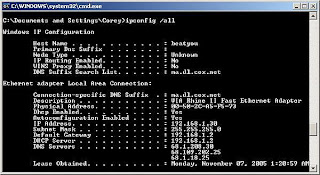
  4. A Command Prompt Window will pop up, resembling DOS operating system. Type ‘ipconfig’ (without the quotes). This will show your computer’s current IP address.
  5. Type ‘ipconfig/release’ and press “Enter”. This will release your computer’s current IP address.
  6. Type ‘ipconfig/renew’ and press “Enter”. Now your computer will be assigned a new IP address.
  7. Type ‘exit’ and press “Enter”. This will close the window. Now your computer has a new IP address.
For Windows vista or Windows 7 users:
  1. Go to “Start”. Type ‘cmd’ in Search bar.
  2. Click ‘cmd’. This will open a Command Prompt Window.
  3. In this window, type ‘ipconfig/release’ and press “Enter”. At this point, your computer’s IP address must be 0.0.0.0.
  4. Type ‘ipconfig/renew’ and press “Enter” again. Your computer will obtain a new set of IP addresses.
  5. Close the window by typing ‘exit’ and pressing “Enter”.
Hopefully changing the IP address will solve your problem. However, if you still face the problem, turn off your router. Turn it on after 2-3 minutes and repeat the procedure. If the connectivity problem remains unresolved, call Helpline service.
Changing your IP address is strongly recommended if you have bought a used computer. It will give computer’s connectivity a whole new start. Connectivity problems that a computer might face when it is moved to a different location can also be resolved by this method.

Statistik

Powered by Blogger.