How to fixing BOOTMGR is missing without install new OS

0 comments
If your Windows 7 or Vista computer has encountered the dreaded “BOOTMGR is missing” error, you aren’t alone. If the problem isn’t hardware related you can fix it with relative ease as long as you have a Windows DVD handy.
If you don’t have one, you can create a Windows Vista repair disk using our guide.
image
Boot off the Windows Vista DVD and then click Next at the first prompt:
You should see a link in the lower left-hand side for “Repair your computer”
The installation process will attempt to find your Vista installation directory. If there’s more than one in the list, select the correct one and then use the Next button again.
Click the first link for “Startup Repair”
The installation process will repair the system, and then prompt for you to reboot.
Alternatively you could have chosen the Command Prompt option instead, and use the following command to fix the boot options only:
bootrec /fixboot
At this point you should be able to reboot your computer, remove the DVD and everything should be working. If not, then head over to our forums and ask your question there. We’ve got some top-notch geeks over there!

Computer Name - Hide or Unhide in Network

0 comments
EXAMPLE: Network window
NOTE: This is where your computer name will be hidden or unhidden from displaying in the other computers on the same network.
network.jpg


OPTION ONE

Using an Elevated Command Prompt
1. Open a elevated command prompt.

2. To Verify and See if your Computer Name is Hidden or Unhidden
A) In the command prompt, type Net Config Server and press Enter. (See screenshots below)

B) If it is hidden, then you will see Yes to the right of Server hidden. (See top screenshot below)

C) If it is unhidden, then you will see No to the right of Server hidden. (See bottom screenshot below)

D) Go to step 3 or 4.
status_hidden.jpg
default_status.jpg
3. To Hide your Computer Name from Displaying in Network
A) In the command prompt, type in bold belowand press Enter. (See screenshot below)
Net config server /hidden:yes
B) You will get a The command completed successfully message afterwards.

C) Go to step 5.
command_hide.jpg
4. To Unhide your Computer Name to Display in Network
A) In the elevated command prompt, type in bold below and press Enter. (See screenshot below)
Net config server /hidden:no
B) You will get a The command completed successfully message afterwards.

C) Go to step 5.
command_unhide.jpg
5. Close the elevated command prompt window.

6. Restart the computer to apply.
NOTE: You can verify the changes in step 2 above.


OPTION TWO

Using a REG File Download
1. To Hide your Computer Name from Displaying in Network
A) Click on the Download button below to download the file below.
Hide_Computer_Name_Network.reg

B) Go to step 3.
2. To Unhide your Computer Name to Display in Network
A) Click on the Download button below to download the file below.
Unhide_Computer_Name_Network.reg

3. Click on Save, and save the .reg file to the Desktop.

4. Right click on the downloaded .reg file and click on Merge.

5. Click on RunContinue (UAC), Yes, and then OK when prompted.

6. When done, you can delete the downloaded .reg file if you like.

7. Restart the computer to apply changes.
NOTE: You can verify the changes in OPTION ONE (step 2) above.


OPTION THREE

Manually in Registry Editor
1. Open the Start Menu.

2. In the white line (Start Search) area, type regedit and press Enter.

3. Click on Continue in the UAC prompt.

4. In regedit, go to: (See screenshot below step 5)
HKEY_LOCAL_MACHINE\SYSTEM\CurrentControlSet\Services\LanmanServer\Parameters
5. In the right pane, right click on hidden and click on Modify.
NOTE: If hidden is not here, then in the right pane, right click on a empty area and click on New andDWORD (32-bit) Value and type hidden and press Enter.
Click this bar to view the full image.
6. To Unhide your Computer Name to Display in Network
A) Type (number zero) and click on OK or press Enter. (See screenshot below step 7)
NOTE: The registry should look like the screenshot above for unhidden.

B) Go to step 8.
7. To Hide your Computer Name from Displaying in Network
A) Type (number zero) and click on OK or press Enter.
Name:  Modify.jpg
Views: 16282
Size:  30.6 KB
B) The registry will now look like this for hidden. (See screenshot below)
Click this bar to view the full image.
8. Close regedit.

9. Restart the computer to apply changes.
NOTE: You can verify the changes in OPTION ONE (step 2) above.
That's it,
Shawn

Disable Right Click on Image Without JavaScript

0 comments
Some time you have ever worked really hard on graphics for your site only to find later that someone has stolen them as their own. You can help encrypt and protect your site with simple adding code.
There are numerous ways to secure and protect your web site from those who want to steal your content or images.

Some webmasters using JavaScript to disable the right click menu on their websites to prevent people from saving images onto their desktop. Buti now I'll give you a simple way, without javascript or editing HTML code on your Blogger dashboard.

Standard image code sample:
<img src="http://yoursite.com/image.png" />
Add this code after image URL
oncontextmenu="return false;"
Finally your code look like this
<img src="http://yoursite.com/image.png" oncontextmenu="return false;" />

WHMCS Hacking with Sumbit Ticket exploit Tutorial

0 comments
Today we are going to learn, how to Hack WHMCS or you can say its submit ticket exploit ,through which we will we will get the cpanel username and password of hosting panel and website hosted on that whmcs.
lets start
Step 1 
Get a website which provide hosting  and find out the option  " submit ticket"
step 2
now open submit ticket option and click on sales department
st1.png (1366×774)
step 3
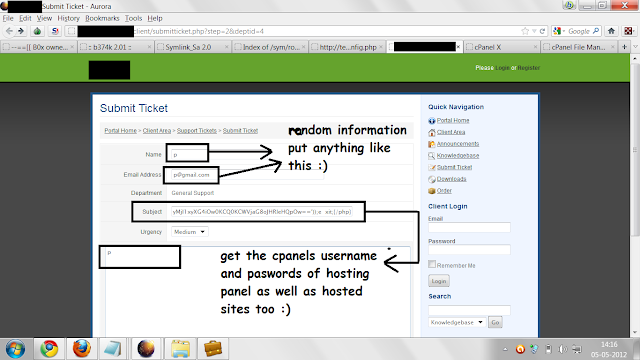
now we have to fill the following
info like "name , email address, urgency put any random info is these fields and main thing is subject filed"
st2.png (1366×768)
fill this code in subject field


and scroll down fill the Captcha click the submit button
st3.png (1366×768)

we will be redirected to next page where it will show cpanel username and password
boom ! you have cpanel usernames and passwords of hosting panel,website hosted on that server
if you are lucky , you may also get the FTP and SMTP passwords too !
st5.png (1368×610)

ok it was all about the the cpanel,FTP and SMTP passwords  if whmcs dont have any website hosted on it you wont get anything then ????????
dont be sad :)
we have one more trick and this will help you to upload the shell on whmcs website :)
how ???
lets move :)
come back to the submit ticket page put any random info in email,name and urgency field
 main step is to put the php code in subject field this time we are going to put the php code, if it got executed successfully we will get a uploader on the website through which  we will be able to upload shell on the website so lets start
fill the any random info in other fields and put this php code in subject field


fill the captcha  click enter, now first of all , have a look on the submit ticket url 
for example 
http://www.website.com/client/submitticket.php 
so to get the uploader replace the submitticket.php with downloads/indexx.php
remember its indexx.php,when code will execute , it will create indexx.php and its uploader
so open the url
http://www.website.com/client/downloads/indexx.php
you will see file upload option !
st6.png (1368×768)
browse the shell and click upload  after uploading shell
opn the url
http://www.website.com/client/downloads/shell_name.php
hell yeah
owned :D

Hack Any Password Protected Wi-Fi Network And Use Unlimited Free Internet

2 comments
Today I’ll tell you how do you hack any password protected wifi network with “CommView For Wi-Fi” software.

First you have to know what is Wi-Fi and how dose it work?
"Wi-Fi" is a type of wireless networking protocol that allows devices to communicate without cords or cables.

1: Wi-fi uses antennas around which wi-fi "hotspots" are created. The hotspots are outlets equipped to receive the radio waves that power wireless networking. Until recently, wi-fi has been confined to more than 10,000 hot-spots in cafes, bars and airport lounges. But various projects are under way to set up city-wide zones, where a series of antennas are installed in the streets, on lampposts or street signs. The hotspots around them together create a much wider area of coverage. Norwich has a mesh network which links each lamppost antenna to the next creating a seamless wi-fi hotspot around the center of the city.
2: The source internet connection is provided by a PC or server to which the antennas are connected either wirelessly or via a cable.
3: Some mobile phones and personal digital assistants (PDA) now have wi-fi chips installed. With mobile phones, this means conventional networks can be bypassed and inexpensive long-distance calls made over the web (using Voice over Internet Protocol, VoIP).
4: Many laptops and handheld computers now come with built-in wi-fi connectivity; it is also possible to add wi-fi to your computer with a special card that plugs into a port on your laptop.
Some organizations provide it for free but maximums provide it for business purpose only. And you have to give a password to access this kind of network.
This software price is $1099. Don't worry, I'm giving you for FREE.
Download This Software from HERE. [Mediafire Link]
Note: Please turn off your anti-virus program before you install this software, otherwise this software will not work properly. After completing installing process you can re-run your anti-virus program.
Now follow the Instructions bellow:
1. Install the software and drivers.
2. Click on ‘Rules’ tab and tick on ‘Enable advance rules’ option.
3. Type ‘a’ on Name box and Past this code on formula box “tods=1 and dmac=FF:FF:FF:FF:FF:FF” like picture bellow. Then click ‘add/edit’ button.
4. A window will appear like the picture bellow. Give a tick on ‘a’ .

5. Then go to ‘Settings’ and click ‘Option’
6. Go to ‘Memory Usage’ tab and set everything just like this picture & click ‘Ok’ (Restart may be required).
7.  Check ‘D’ funnel and uncheck another two funnel from the right top of this window.

8. Click ‘Search’ button and find the network that you want to creak.
9. Then drag it on ‘Channel’ tab and click ‘Capture’ button.
10. Now which one is do not capturing anything give it to password protected network and connect it. When it will ask for password, give any as you wish.
11. It will show this massage “Connected with limited connectivity”.
(I have no Wi-Fi connections at this time. that is why, I can’t share some screenshots).
12. Click on main menu again and then click on ‘Packets’ Tab. If everything was all right, you will see some Couple of Packets.
13. Click right button on “ARP REQ”  Packet and then > “Send Packet(s)” > Selected.
14. This menu will appear.
15. Now change all values just like this and click ‘Send’.
16. Go to ‘Rules’ Tab again and uncheck the Rules “a” .
17.  Select first 20000 packets and save it. Make sure you are saving it as “dump cap” file in place of “ncf” file format. (I have no Wi-Fi connections this time, that is why I can’t share some screenshots).
18. Now download a zip folder named “Aircrack-NG” from HERE. And extract it.

19. Open ‘bin’ folder and run this file ‘aircrack-ng-GUI.exe’. Then go where you saved the packets, select all and click launch.

20. An ‘IV’ list will came. Select the network that you want to creak.

21. Click ‘Connect’. You will be connected with your desire network like a magic !

22. Enjoy the Unlimited Wi-Fi Internet.

Also you can do with this software :
 
Done...

Statistik

Powered by Blogger.